This article was written by myself and Dan Chang back in 1992 for the Journal of Computer Game Design sometime after we finished making M.C. Kids for the NES. Some of it may be still be useful, especially if you are just learning programming and want to do a side scrolling game.
Some of the issues solved here are less relevant today. An NES used a 1mhz 6502 processor with only 2k of ram by default. M.C. Kids used a kind of cartridge that added 8k of ram giving us a total of 10k. Dealing with a 1mhz processor and only 10k of ram is not something most game programmers of today need to deal with. Today we have GeForce4 cards or a PS2 and it's vector processing units. We have 32 to 64meg of ram and we have DVD drives for storage. Still, I'm sure some of the concepts here still have some relevance.
© 1992 Echidna
Gregg Iz-Tavares and Dan Chang
M.C. Kids (That's Em Cee Kids)
In this article, we take an in−depth look at programming a Nintendo Entertainment System (NES) "platform game".
The Development Team
Four people, Darren Bartlett, Gregg Iz−Tavares, Dan Chang, and Charles Deenen, created M.C. Kids in about eight months. Darren designed all the levels, laid−out all the maps and drew nearly all the artwork. Gregg and Dan programmed the game and all the tools needed to implement the game. Charles composed the music, created the sound effects, and programmed the music driver. By today's standards, this is a rather small team; look at the credits for some other platform games, and you'll see perhaps six artists, five level designers, one musician, one sound effects person, and five programmers!
NES Capabilities
Here is a summary of a Nintendo's features:
- Up to 256K of program ROM
- Up to 256K of character (graphics) ROM
- 256 background characters images available at once, each 8x8 pixels in size
- 256 sprite images available at once, each 8x8 pixels in size
- 64 sprites, each 8x8 pixels in size, with up to three colors.<li> Three sound channels, one noise channel, and one DMA sample channel for playing samples.<li> Four screen palettes of three colors, four sprite palettes of three colors and one background color.<li> 2K program and 2K video RAM built-in
You may expand the RAM by including it in your cartridge. You may add 8K of RAM to the program (direct CPU addressable) side, which allows you to keep track of more game information. You may also add 8K of RAM to the video side, which allows you to have four display screens instead of the normal two, and also allows you to re−define your characters and sprites. Without 8K of RAM on the video side your graphic images (character font and sprites images) must be hard−coded into ROM.
Most video game systems use a character set and sprite system for displaying graphics. Unlike most home computers today that use a bitmapped display for graphics, the game systems have just a character mode. This character mode is very similar to the text mode on an EGA or VGA card. On a VGA card you can install your own font into the card's RAM through software (this is how the Norton Utilities 6.0 gets its spiffy look). On the NES you MUST install your own font because it doesn't have one built in. If you redefined all or most of the font characters to be pictures then you could make graphic games in text mode. Almost all video game systems work this way, including most systems at the arcade. What makes the video game systems look so good is that unlike VGA text mode in which each character can only have 2 of 16 colors, an NES character can have 4 of about 51 colors. Other systems like the SNES (Super NES) can have characters with up to 256 of 32768 colors.
The advantage of a character−based game is that the entire screen takes far less memory to manipulate. An NES screen is 32 characters across by 30 characters down, and requires only 960 bytes to represent. This is much less memory to deal with than say an MCGA screen (64000 bytes), a Mac Plus screen (about 22000 bytes), or even a CGA screen (16000 bytes).
Most video game systems also have what we call sprites. A sprite is a shape you can define and display in front of the text/graphics screen. Sprites are very much like those plastic colorforms found at toy stores. You can place them anywhere and they do not affect the picture behind them. On the NES you can display 64 8x8 pixel sprites, each with 3 colors. If more than 8 are displayed on the same horizontal scan line then the higher number sprites will not be display on that line. You must design around this. If you've played Super Mario 2 or 3 and you see Mario and 4 monsters there are around 24 sprites on the screen. If all the monsters are on the same horizontal strip you will notice the sprites flicker. This flickering was programmed because if it wasn't then one of the monsters or Mario would disappear.
On the NES, you can create 4 screens and 4 sprite palettes, each of which are 3 colors plus one global background color. Sprites and screen characters can choose which of their 4 palettes to be displayed in. This allows you to display 25 colors on the screen without resorting to any tricks.
The 6502 can only address 64K of memory so the ROMs are bank switched. You can purchase different bank switching schemes for your cartridge like 16K banks or 8K banks for the program ROM and 4K to 1K banks on the graphics ROM.
You can also purchase a battery in your cartridge with the 8K of program RAM so it will be persistent (i.e., you can save your game) and you can purchase a timer interrupt if your product needs it for sound or special video tricks. Each of these cartridge extras raises the production price of your cartridge by a couple of dollars. If you plan to sell a hundred thousand or more cartridges, a couple of extra dollars per cartridge can really add up to lots of lost profit so usually you need to design your game to keep the cost as low as possible.
Platform Games
What is a platform game? It's a game in which you control an on−screen character who walks on platforms. Another common term for these types of games is "a ledges and ladders game" since most of them have ledges (platforms) to stand on and ladders to climb up or down between platforms.
Platform games have been around for a long time. The first I know of was an arcade game called Space Panic by Gremlin which was quickly copied to the Apple II to become Apple Panic and Lode Runner. Other early platform games are Donkey Kong, Kangaroo, Mappy and Mario-Bros. In the early 80's a game called Pac-Land hit the arcades. It was the first platform game in which one of the goals was to collect lots of items and also the first platform game to scroll. It was not a big hit but it's ideas were soon adopted into most platform games.
The next big improvement came with Super Mario Bros. Up until that time most platform games had only one goal − stay alive as long as possible. The games had few levels, but a player could, if skilled enough, play the game forever. Super Mario Bros was one of the first platform games to add an adventure element and an ending. In Super Mario Bros the object is to save the princess, and to do it the player has to play through a large number of levels. Super Mario Bros had about 32 levels. Once the player finishes all 32 levels the game is over; you've "rescued the princess".
Today's platform games have added quite a few new twists to the older designs. The Mario series is considered the standard against which all other platform games are compared. Mario 2 had 23 levels and added your choice of four characters, each with different abilities. It also added vastly better graphics and about twice the object types as Mario 1. Mario 3 had 88 level s, and instead of different characters, you had different suits, each suit giving the player new abilities. Mario 4, with its 64 levels, added quite a few more object types.This Mario was designed to be completed: you rarely run out of lives, and you can save your progress every step of the way.
M.C. Kids
In M.C. Kids the Hamburglar has stolen Ronald's magic bag and you, as Mick or Mack, must find the magic bag before Hamburglar does something we'll all regret. You start out at Ronald's Clubhouse and must find at least four of Ronald's magic cards before he can send you on to Birdie's Treehouse.
The game starts with a brief intro and then shows one of the M.C. Kids on a top−down map showing 6 levels and the clubhouse. The player can guide the kid down the connecting paths to the various levels. Upon entering a level the view changes to the traditional side view for a platform game. The player now proceeds through the level attempting to find at least one magic card and then finding the exit from the level.
The player continues going in and out of levels attempting to find magic cards. Once enough magic cards have been collected the player visits the host of the current land who sends the player on to the next land.
Throughout each level the player encounters various objects that may help or hinder him on his way. Springboards spring him high into the sky. Moving Platforms carry him to hidden destinations. Creatures of various sorts bite him. PickupBlocks can be carried and thrown at the creatures to knock them off the platforms.
M.C.Kids has about 43 playable levels with over 28 different creatures, 16 types of objects to manipulate and 27 distinct types of platforms, each with many variations.
Game Levels
Levels can be any size up to about 20 NES screens. The largest level requires 5120 bytes in RAM; each byte represents one 16x16 pixel tile (four 8x8 pixel characters). If we had chosen 8x8 pixel tiles, the same maps would have required four times the memory or 20480 bytes. The levels are stored compressed in ROM, in about one−third the uncompressed size. Without compression, we couldn't have even fit half of the levels.
By unpacking the levels into RAM, we gained the ability to change the level during play. For example, the player can pick things up like Arches, Blocks, 1Ups, Cards and so forth that start off as part of the level. We attempted to reduce the cartridge cost by designing the game without the optional 8K program RAM. Each 16x16 tile would have a flag represented by one bit in RAM; the entire map's flags would take 640 bytes to represent. Each bit would represent whether the tile should be displayed as itself or as its alternate (see description of the seventh tileset byte, below). However, we deemed this solution sub−optimal, and we lobbied successfully for the extra 8K of program RAM. Without the extra RAM, we would have most likely have been forced to redesign the game either so levels didn't have to be modifed or so that it only scrolled in one direction. Super Mario Bros 1 has no RAM, and their solution was to only scroll in one direction. By scrolling in only one direction, the program does not need to remember items collected or affected by the player, because once an item has scrolled off the screen, it will never be seen again.
Tilesets
Each tile type has associated with it seven attribute bytes. The first four bytes define which characters to put in screen memory for each corner of the tile. The fifth byte defines which colorset the tile uses (0..255). The sixth byte specifies which type of tile it is (0..255). Some of the type values are: 0 = Sky, 1= Solid, 2 = Sloped left, $30 = Arch, $31 = Card, $17 = Falling Bridge. The seventh byte defines what the tile may change to if necessary. (E.g., collecting an Arch changes it to a blank sky tile, digging a piece of sand tile changes it to a dino bone tile.)
Each tile also has 5 collision routines (see Collisions below), 2 contour tables and various flags including:
- AT_BEHIND: If an object touches (collides with) this tile the object's sprites should be displayed behind the tile. This is used for tiles like clouds, lava and fences.<li> AT_EYES: If the player collides with this tile, eye sprites will be displayed. This makes the player's eyes show through the clouds.<li> AT_ABOVE: If a hill tile can be placed on top of this tile this flag will be set. (See Collisions, problem 1)
Each Tileset may contain up to 64 characters and at most 64 tiles. A tileset can use no more than 4 colorsets (since the NES can only display 4 character palettes).
Each level in the game may consist of up to four different tilesets. Every level uses the GLOBALS tileset that contains global items like the ending line, golden arches, pickup blocks, etc. Other tilesets include GRASS, FOREST,and LAVA where the GRASS tileset has lots of green tiles, the FOREST tileset has tiles for trees and leaves and the LAVA tileset has lava and rocks and burning bridge tiles. There are about 44 tilesets in M.C. Kids to choose from.
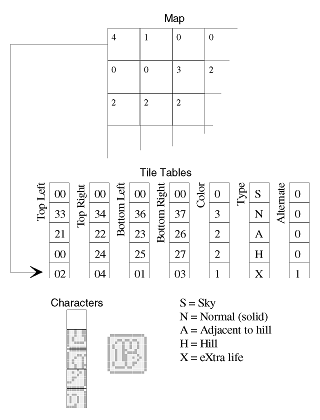
In the above example the tile at position 0,0 in the map is retrieved. It is tile 4. Looking into the tables we pull out the four characters that make up tile 4 and place them in their proper positions to create a 1Up block (extra life). We also note that the tile uses colorset 1 and is of type X.
Shapes and Animation
A shape is several 8x8 sprites grouped together. There are 364 shapes, and 213 "animations" using those shapes. The shape tables take almost 8K to represent and we used a fairly compact format for the majority of shapes. There are two formats. The first format only allows sprites to be placed in an 8x8 grid:
Colorset (0-15),
X Pixel offset (+/- 127)
Y Pixel offset (+/- 127)
Width in 8x8 sprites
Height in 8x8 sprites
(Width by Height sprite numbers (0-127))
The second format allows the sprites to be placed anywhere relative to each other:
Colorset
REPEAT {
 X Pixel offset (+/- 127)
 Y Pixel offset (+/- 127)
 Sprite Number (0-127)
}
END Marker.
The second format also has a special "change color set" code. If the X Pixel offset is $80 (−128), then the next byte is the new colorset for the rest of the sprites. This allows one shape to use many colorsets.
I've also seen a more compact format, which is something like this:
Colorset (0-15),
X Pixel offset (+/- 127)
Y Pixel offset (+/- 127)
Width in 8x8 sprites
Height in 8x8 sprites
First Sprite Number (0-127)
In this format, if the first sprite number is 17, the width is two, and the height is three, then the shape would use sprites 17, 18, 19, 20, 21 and 22.
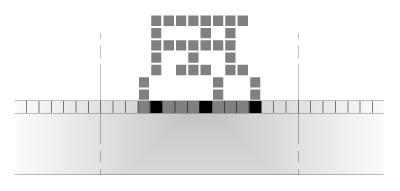
Shapes default to facing right. Flipping a shape faces it to the left. Most shape's "hot spots" are at the bottom center pixel:
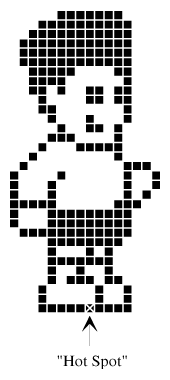
Placing the above shape on screen at position (0,0) would result in:
An animation specifies the order and duration for a list of shapes:
SPGopher1,4
SPGopher2,4
0
The '0' marks the end of the animation at which point it repeats. When the animation starts to repeat, the system notifies the object routine, which can then modify its behavior. (see Objects below)
The duration is represented by six bits, so the longest any given shape can remain displayed is 63 ticks (63/60 second). The other two bits specify flipping the shape in the X or Y direction. This flipping information is in addition to the object−controlled flipping of a shape.
If I were to do it again, I would add positional information into the system so that an animation could move an object.
Objects
Our system allows for N objects to be active at any one time; for M.C. Kids, N is 16. This is a large number, as the program begins to bog down with more than about seven objects. We discovered this limit during development, and we re−tuned most of the levels so the player can't lead more than six monsters together. Still, to deal with some unforeseen situation, the program will handle 16 objects. If you have a third party NES controller with a turbo button, stand in front of a snow pile and press the button. You should be able to get 10 or more snowballs in the air at once. Games like Mario 2 and Mario 3 are carefully designed so that the program almost never introduces more than five objects at once.
Objects are introduced into the object system through various means. The most common are objects that appear as the player moves through the level. For each level in the game there is an object introduction table. This table describes where various objects appear in the level such as gophers, fish, crabs and moving platforms.
Each entry in the table has 3 data fields: X position, Y position and object type. The object table is sorted in ascending X position order. The object introduction routines keep an index for the current position in the table.
When the player moves to the right, the current screen position is compared with the current object in the table. If the object is inside the screen it is introduced to the active list of objects and the index is incremented. If the object is not inside the screen then all objects further along in the table are also not inside the screen since they are farther to the right.
The routines also handle object introduction when scrolling left, up and down in a similar manner. For moving up and down there is a table of indices sorted in ascending Y position.
There is also an active flag table in RAM with one flag for each entry in the object introduction table. When an object is introduced from the object introduction table its corresponding active flag is set. When the object introduction routines are about to introduce a new object they first check its active flag to see if the object has already been introduced and if it is they don't introduce the object again.
Objects may be added for other reasons. For example, when the kid steps on a SpringBlock tile, a SpringBlock object is added to animate the SpringBlock. When the kid picks up a 1Up, a 1Up object is added which spirals and flashes a 1Up shape. When the boat hits water a splash object is added. When a leaf generator object is present it adds falling leaf objects at regular intervals.
For every object there are flags (bits) for the following:
- OB_HASBIT: Is the object from the object introduction table? If so, then the object has an active flag. The active flag indicates whether the object is currently active on the screen. The active flag is used so that the object will not get introduced more than once.
- OB_EARLY: Can the object be removed prematurely? Trying to add a fifth object with this flag set will remove the oldest object with this flag set from the active list. (E.g., if the player runs quickly across several falling bridge tiles, he will slow the game down by introducing too many animations. However, by setting this flag for the falling bridge objects, the total number of active falling bridge objects is limited to four.)
- OB_XPHYS: Does the object use X Physics?
- OB_YPHYS: Does the object use Y Physics?
- OB_XCHK: Should the object check left/right tile collisions?
- OB_YCHK: Should the object check up/down tile collisions?
- OB_ONCE: Should the object never re-appear? Each object in the map has an active flag which is set when the object is introduced. This prevents the object from getting introduced multiple times. The active flag is cleared when the object is removed (such as when the object scrolls off the screen) so that it can be introduced again when the player ventures back the that part of the level. If OB_ONCE is set then the object's active flag will never be cleared and therefore the object will never be introduced again.
- OB_REMOVE: Should the object get removed when it is four tiles off screen? If this bit is not set, then it is the object's responsibility to remove itself.
For each object in the list the main object loop will do the following things.
- Call the specific object's routine (e.g., call MCKidDoit for the Kid, call GopherDoit for the Gopher, and call CrabDoit for the Hermit Crabs).
These routines do object specific things. (E.g., the beaver routine looks for the Kid, and if he is below the kid, he will stand and look back and forth; if he is above the kid, he will run toward the kid. A platform routine follows its track, The kid's routine reads the joystick and acts accordingly. )
- If the object has X Physics turned on, then the X Physics are computed using Acceleration, Velocity and Position. Object positions in the game are 16 bits significant and have a resolution of 1/4 pixel. This is our 'decimal place' and allows the objects to move smoothly at various speeds. This provides that Mario "feel". Some games force all monsters and the player to move at some integer multiple of pixels per vblank, and thus lose some of that fluid "feel".
There are two types of X movement routines. One routine is used when the object is in the air, and the other is used when the object is on the ground. The routine for movement in the air just uses normal physics. For movement on the ground, we need to make the object follow the contour of the ground, so for each pixel moved left or right, the Y position is adjusted to the correct height.
- Object to Object collisions are determined. The current object is compared with all other objects it needs to be compared to, and if there is a collision, the object's collision routine is called. (E.g., for a Gopher, the routine GopherClid is called. GopherClid turns the Gopher around. For the Fill-In-Block, it checks to see if the object collided with the Kid; and if so, it sets the correct variables to allow the kid to pick it up [if the Kid chooses to do so]). It also checks if it collided with a monster, in which case the monster gets hurt.
Every object can only collide with one other object per frame, so every object is assigned a collision priority so that it will collide with the most important object. It is more important to know that the kid hit a monster than to know that the kid hit a PickupBlock.
All objects have a collision matrix, so that they can only collide with certain other objects. The kid collides with everything. A PickupBlock only collides with the kid and monsters. Some monsters collide with the kid, other monsters, and various project tiles. Certain other monsters don't collide with other monsters. Not having to check every possible collision saves tons of time.
- If the object has horizontal tile collisions turned on, then left or right tile collisions are checked depending on whether the object it moving left or right.
To do the collision, either the left most or right most pixel of the current object is sent to the left or right tile collision routines. The tile type of the tile in the map t hat contains this pixel is looked up. A tile routine exists for each particular tile type; it decides whether a collision has taken place (or what other action should be taken, like collecting an Arch or crossing the ending line). If a collision occurs, then the specific directional collision routine for the particular object is called. (E.g., if we're a gopher and we collided left, then GopherLeft is called which makes the gopher turn around and go right; if we were going right then GopherRight is called, which makes the gopher turn around and go left.)
- If the object has Y physics turned on then Y physics are computed.
- If the object has vertical tile collisions turned on then Y tile collisions are done, similar to the X tile collisions, but only if the object is in the air. If the object is on the ground, then 'Ground' Collisions are done.
This means that every tile type can have up to five routines (TileLeft, TileRight, TileUp, TileDown, TileGround). Most tiles point to the same routines, either SolidLeft, SolidRight, SolidUp, SolidDown, and SolidGround, or SkyLeft, SkyRight, SkyUp, SkyDown, and SkyGround. Every tile also has two contour tables, each 16 bytes in size, one for walking to the left, the other for walking to the right. The tables tell the routines how to adjust the Y position for each pixel moved in the X direction.
Every object has eight routines: ObjectInit, ObjectDoit, ObjectClid, ObjectLeft, ObjectRight, ObjectUp, ObjectDown, and ObjectGround.
If I were to do this again I might get rid of many of the flags and just have each object call the routines it needs. Thus, instead of there being an X physics flag, I would just have any object that needs X physics call a routine to compute it.
Collisions
Now for the fun part. NOT! First, here are all the kid's points that are checked for collisions against the tiles:
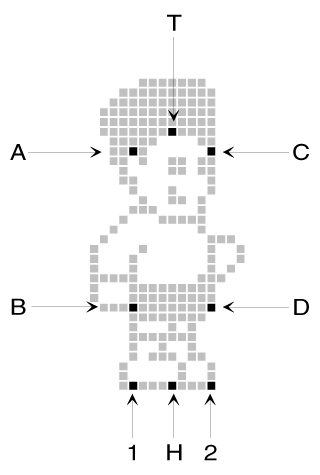
Point H is the Hot Spot and is considered the position of the kid. This spot will usually be inside the top of a tile:
This means the kid is standing in/on a normal solid tile. If he had been one pixel higher, he'd be 'in' a sky tile.
Points 1 and 2 are used for checking when the kid should fall off a vertical ledge. If both points are not on something then the kid should fall.
Point A, B, C and D are used for checking left and right tile collisions. Only A and B or C and D are checked depending on the direction the kid is traveling. Points B and D are checked for every type of object, but points A and C are only checked for the kid.
Point T is used for checking collisions when the kid is going up, like when he bonks his head into a platform.
Most of these points are adjustable in some way. Points 1, A and B always have the same relative height but can be moved left or right together. The same is true for points 2, C and D. Point T can be moved up. Points H, 1 and 2 can be moved down together.
Terrain
One of the hardest things to program is the object−terrain interaction. Here is an example slope:
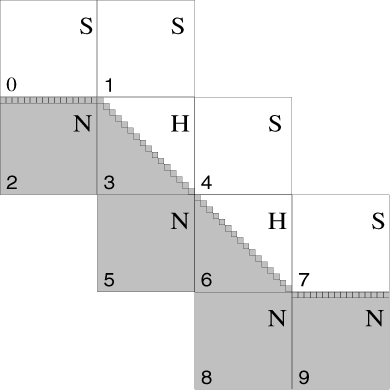
For easy reference, the tiles are numbered 0 through 9, as well as being assigned a letter representing its type, where N = Normal Tile, H = Hill Tile and S = Sky Tile.
I use offset tables for each tile that states for each horizontal pixel, how to get to the next pixel, left or right in the Y direction. Thus, if you are on pixel eight on a left rising hill slope, and you move left to pixel seven, the table might say move up one pixel. This may not be the best way, because it means that all movements are relative instead of absolute, so if there is an error somewhere it could get exaggerated. By using a table, we can have irregular shaped slopes.
Some of the problems we encountered in implementing the terrain logic:
- When walking left on tile 9 the kid will eventually move into tile 8 (where he doesn't belong). To solve this I have to 'look-up' one tile to see if the kid should start walking up a hill. One possible solution is to make another tile type B for 'Beginning of hill' and placed it at tile 9. Then, when the kid walks into a type B tile we would know what to do. This could be a problem for the artist, though, because if he or she put a type N where there should be a type B, the kid would walk into hills.
- When walking left on tile 3 the kid will eventually walk into tile 0 (the sky). This bug remains in M.C. Kids (check it out). It could be fixed similarly to problem 1 by making a new tile type E for 'End of Hill' that would be placed at tile 0. Then when the kid walks into a type E tile, we would know what to do.
- Often there are type N tiles up in the sky as platforms. Usually the kid is allowed to walk right until the kid's point 1 is 'off the tile', and then the kid will fall. This is the way we want it. However, what if the next tile is a Hill tile (type H)? When the kid walks down the hill, the kid's hot spot (point H) should always be on the 'slope'. However, since we don't allow the kid to fall until his point 1 is off the edge of tile 2, he won't walk down the slope. To solve this problem we created a new tile type, type A, for Adjacent to hill, to place at tile 2. This tile type is placed next to Hill tiles, and causes the kid to fall when point H leaves the tile, instead of when point 1 leaves the tile.
Mario 3 solves this problem differently. It uses type N tiles for platforms and other solid tiles. They act like our type N tiles, in that the kid won't fall until his point 1 is off the tile. However, if the level contains slopes, than all type N tiles change their behavior to something similar to our type A tiles. Thus, in Mario 3, you cannot jump up and down with only your point 1 on the tile in any level that has slopes.
Many of the reasons for these contortions have to do with speed. Most video game systems must run at 60 frames a second, and if you have to look up 4 or 5 tile positions per collision pixel per frame you are going to run out of time. All this is something you should consider when designing a platform game. It is much easier the create a platform game with no slopes, so if you are short on time, then design your game so that it doesn't need slopes.
Altogether, we have around 100 tile types, such as Solid, Left Slope, Right Slope, JumpThru, Death, Spring Board, Slippery Solid, Slippery Left Slope, Slippery Right Slope, Go behind Left Slope, Go behind Solid, Ending Line, Falling Bridge, and Guide Tiles (for moving platforms).
For each tile type, we also have information like: Maximum speed (slower going up hill), Extra Acceleration (used for speeding down hill and or slowing up hill), Friction (used for slipperiness), and Turn around speed (how quickly the kid can reverse direction). If we wanted to do Sonic the Hedgehog, we could have also added animation information (for what direction Sonic should be facing), and slope angle information (so that when the player presses jump, he jumps at some angle relative to the slope).
If I were to do this again, I would probably add additional tile types for the above problems. I might also change the offset tables to be absolute instead of relative depending on the target processor. Parallel tables were used extensively for most of the data in the game mostly because a 6502 can more easily deal with parallel data than it can with records or structures. With other processors, like the 68000, it would be far more efficient to use structures or records.
M.C. Kids Data Statistics
Here's a look at how many items we had in each category, how many bytes the items required in compressed form, how many bytes the items expanded to, and how much was saved by compressing the data:
|
| Packed | Unpacked | Savings |
Levels | 56+ | 58876 | 177944 | 67% |
World Maps | 20 | 2947 | 4856 | 39% |
Houses | 7 | 878 | 1867 | 53% |
Text Msgs | 64+ | 4211 | 7836 | 47% |
Pictures | 9 | 1683 | 3590 | 54% |
Tilesets | 29+ | 5691 | 7801 | 27% |
SpriteFonts | 17 |
| 34816 |
|
TextFonts | 3 |
| 3072 |
|
CardFonts | 4 |
| 4096 |
|
TilesetsFonts | 44 |
| 45056 |
|
PictureFonts | 9-10 |
| 16384 |
|
ShapeTables | 577 |
| 8098 |
|
Object+Tile Tables |
|
| 5854 |
|
Music+Driver |
|
| 12372 |
|
Monster Routines |
|
| 13030 |
|
Kid Routines |
|
| 4089 |
|
Kid Map Routines |
|
| 688 |
|
Tile Routines |
|
| 1000+ |
|
Missing: scrolling, animation, sprite, vblank, setup, game flow, unpacking and other routines.
Shameless Plug
Well, there you have it. Obviously, if you need a platform game, you should come to us. Our engine can handle nearly any kind of platform game currently designed, and we can tailor it quickly. Of course, now that you've read this article, you know how to do it too!